Installation
ShareMouse is available for Microsoft Windows and Apple macOS and needs to be installed on all computers.
ShareMouse uses a local WiFi or Ethernet network connection to transmit the mouse cursor movements and keyboard input.
ShareMouse does not work over the internet.
If using a VPN, you must configure "split-tunneling" in your VPN software to exclude local network traffic.
Back-up the installation file as we do not keep a download installer archive.
ShareMouse allows to control multiple computers from one mouse/keyboard but you still may need physical input devices connected to the computers, for example if you wish to configure the system before booted into the OS (BIOS, system recovery, etc).
Windows installation
To install ShareMouse on a Windows computer:
- Download and double-click the installation file.
- Follow the on-screen instructions.
- Repeat the installation on all computers you wish to link with ShareMouse.
- If you already purchased a license key, register the license key on one(!) of the installations.
You can install ShareMouse for all users of the computer (requires administrative rights) or just for yoursef (without needing admin rights but without features provided by the ShareMouse Windows service).
If you have even more restrictions, you can run ShareMouse without admin rights with the portable edition.
Back-up the installation file as we do not keep a download installer archive.
Windows service
ShareMouse installs two Windows services with following benefits:
- Remote control of secured UAC-dialogs.
- Remote control between applications running with different access rights (admin vs. user rights).
- Sending of CTRL+ALT+DEL to a remote PC.
- Synchronize remote login/lock and shutdown.
- Optional automatic software updates
The ShareMouse client appends "(Windows service)" to the program name to indicate that it has been launched by the ShareMouse service:

The ShareMouse service is not available in portable mode as it requires an installation on the guest computer.
If you need to restart ShareMouse with the service installed, you need to restart the ShareMouse service, not the regular program file (video tutorial).
Installation without admin rights
If you cannot obtain admin rights for the installatiokn:
- Instead using the regular installation program, download the portable edition.
- The portable edition is a ZIP archive file. Extract its content anywhere on your hard drive.
- Launch the program from there.
The portable edition does not include the ShareMouse Windows service.
Portable mode
If you want to use ShareMouse temporarily in different environments, e.g. a freelancer working in a client office, you can run it from an USB memory device:
- Download the ShareMouse Portable Edition ZIP file.
- Extract the ZIP file contents into any folder of the USB device.
- Double-click the program file "ShareMouse.exe" located in the program folder on the USB device.
ShareMouse automatically enables portable mode if being launched from a USB stick. If USB device detection fails, you can force portable mode by launching ShareMouse with command-line parameter -portable (video instructions).
In portable mode, ShareMouse does not write any files onto a guest computer.
- Shut down the program before unplugging the USB device to prevent losing program settings changes.
- In portable mode, ShareMouse cannot install/use the ShareMouse Windows service.
MacOS installation
To install ShareMouse on a Mac:
- Download the Mac installation file.
- Double-click the setup program to open the installer.
- Drag the ShareMouse icon from left to right into the application folder:

- Repeat the installation on all other computers.
Do not skip to apply following important settings:
Important macOS system settings
ShareMouse must be configured in macOS settings to be granted access to following system permissions:
- Accessibility – This is required by ShareMouse to read your mouse and keyboard input to transmit it to the remote computer.
- Full disk access – ShareMouse allows you to drag & drop files and to synchronize the clipboard between computers which requires that ShareMouse can write to your hard-disk. ShareMouse additionally stores its program settings in a folder with access by the ShareMouse login service and the program file.
ShareMouse never stores or transmits your files and/or mouse/keyboard input over the internet (see our privacy policy).
The configuration procedure differs between different macOS version as Apple moves settings around and rename menu items:
MacOS 13-26
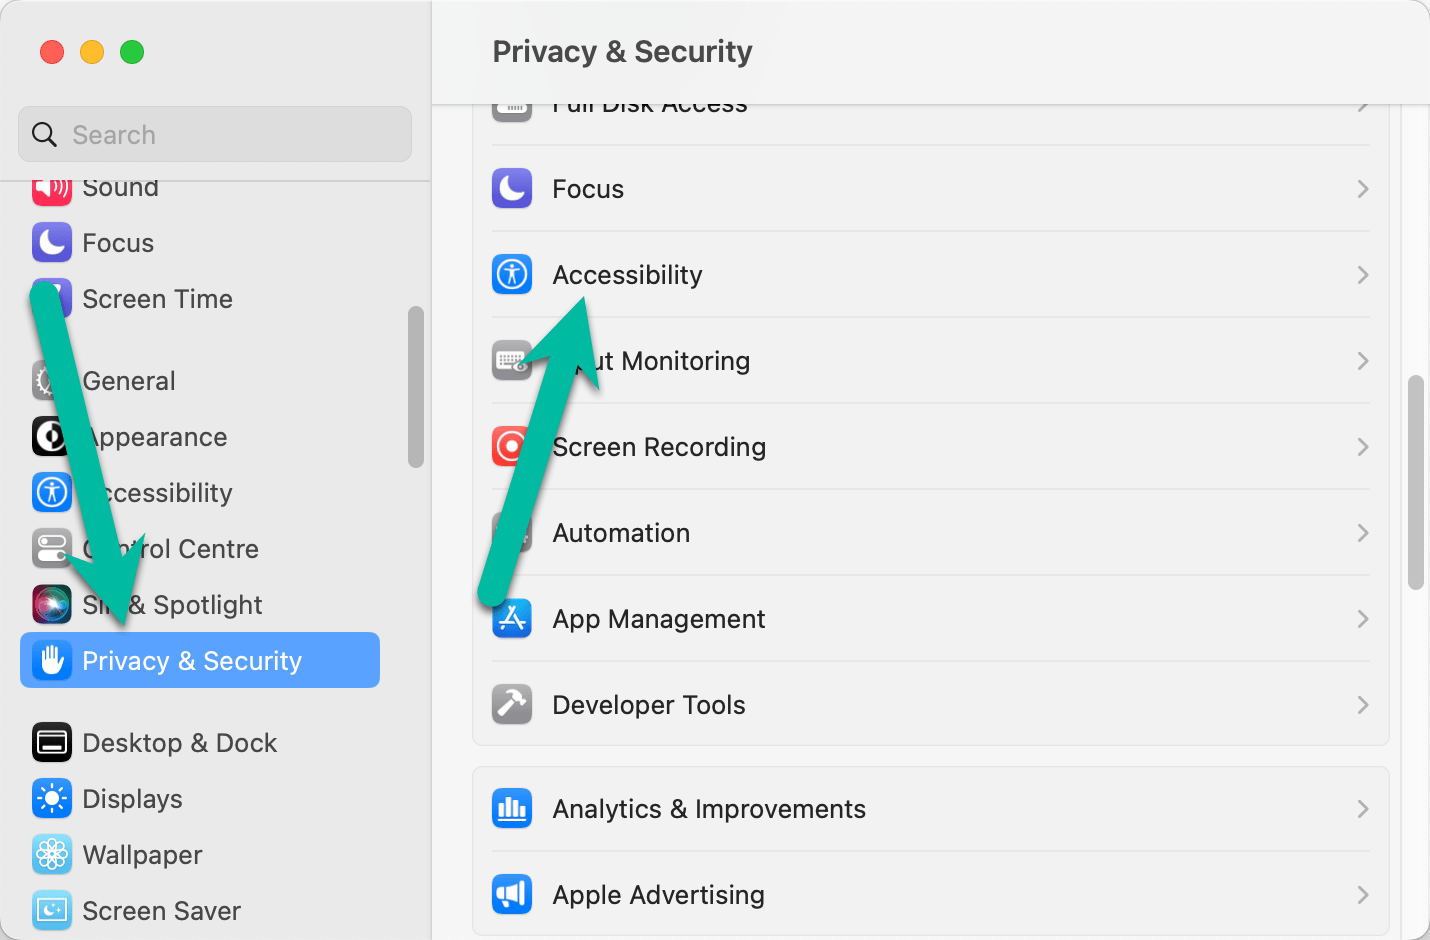
- Open the macOS System Preferences and select "Privacy & Security » Accessibility":

- In the list of applications, lookup "ShareMouse" and make sure that the option is enabled:
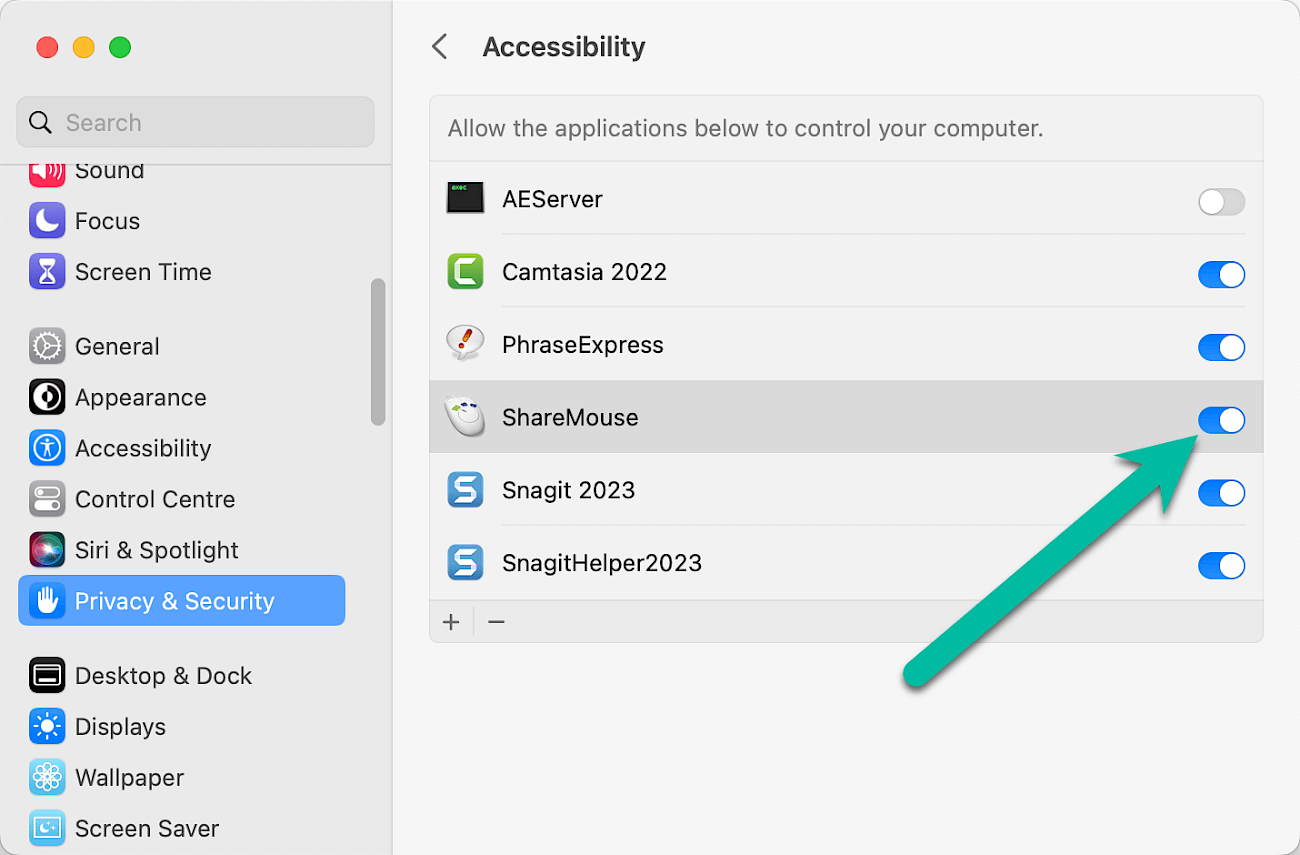
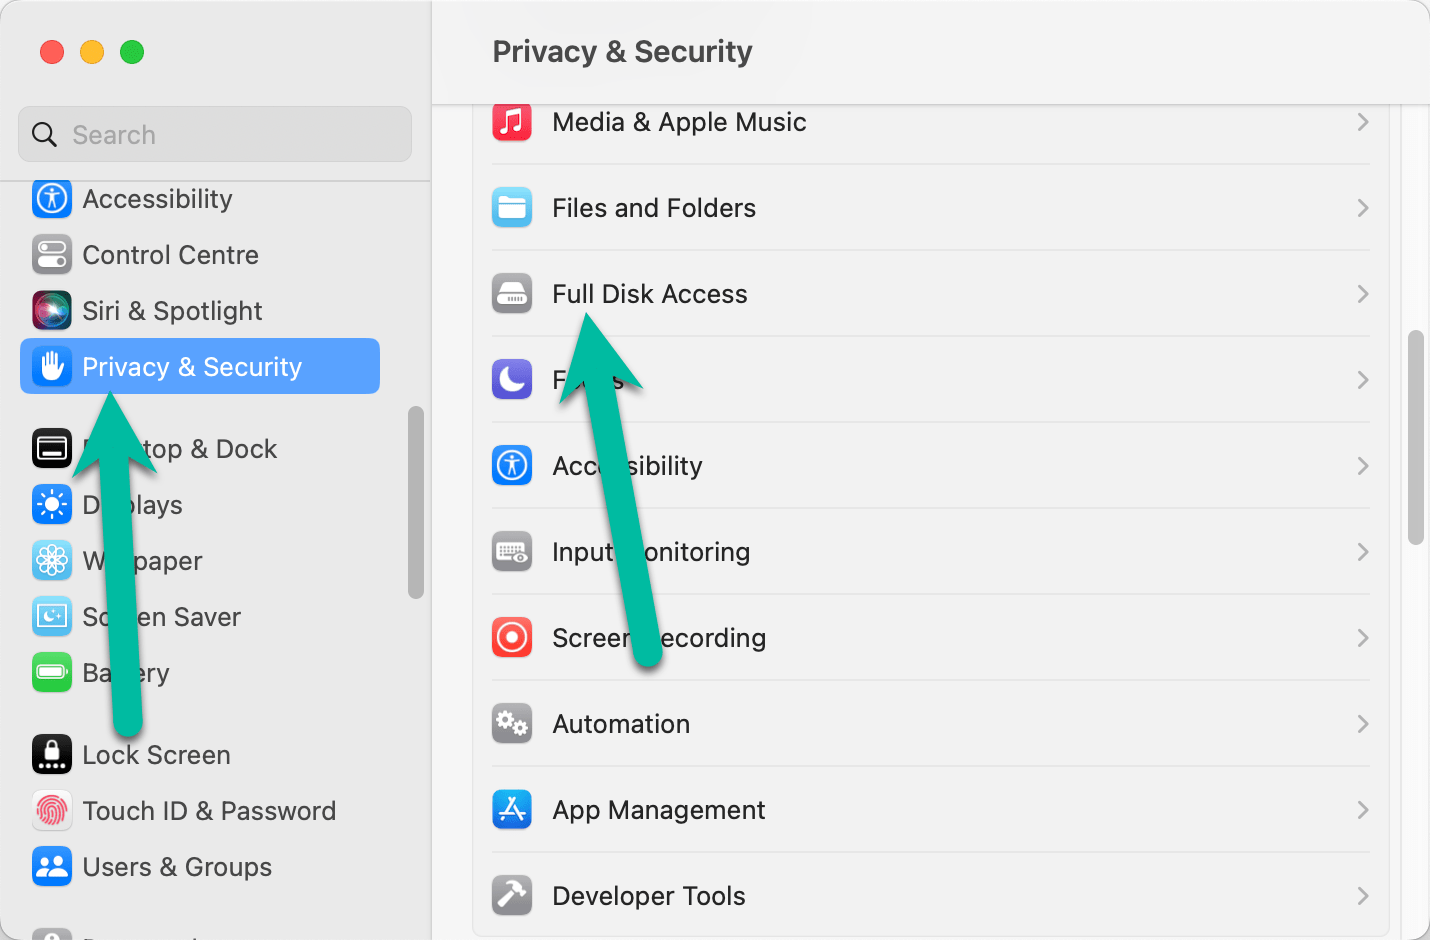
Important: Never uncheck this option while ShareMouse is running. Exit ShareMouse first before unchecking this option. Otherwise, the system locks up and you need to reboot your Mac. - Return to section "Privacy & Security" and select "Full disk access":
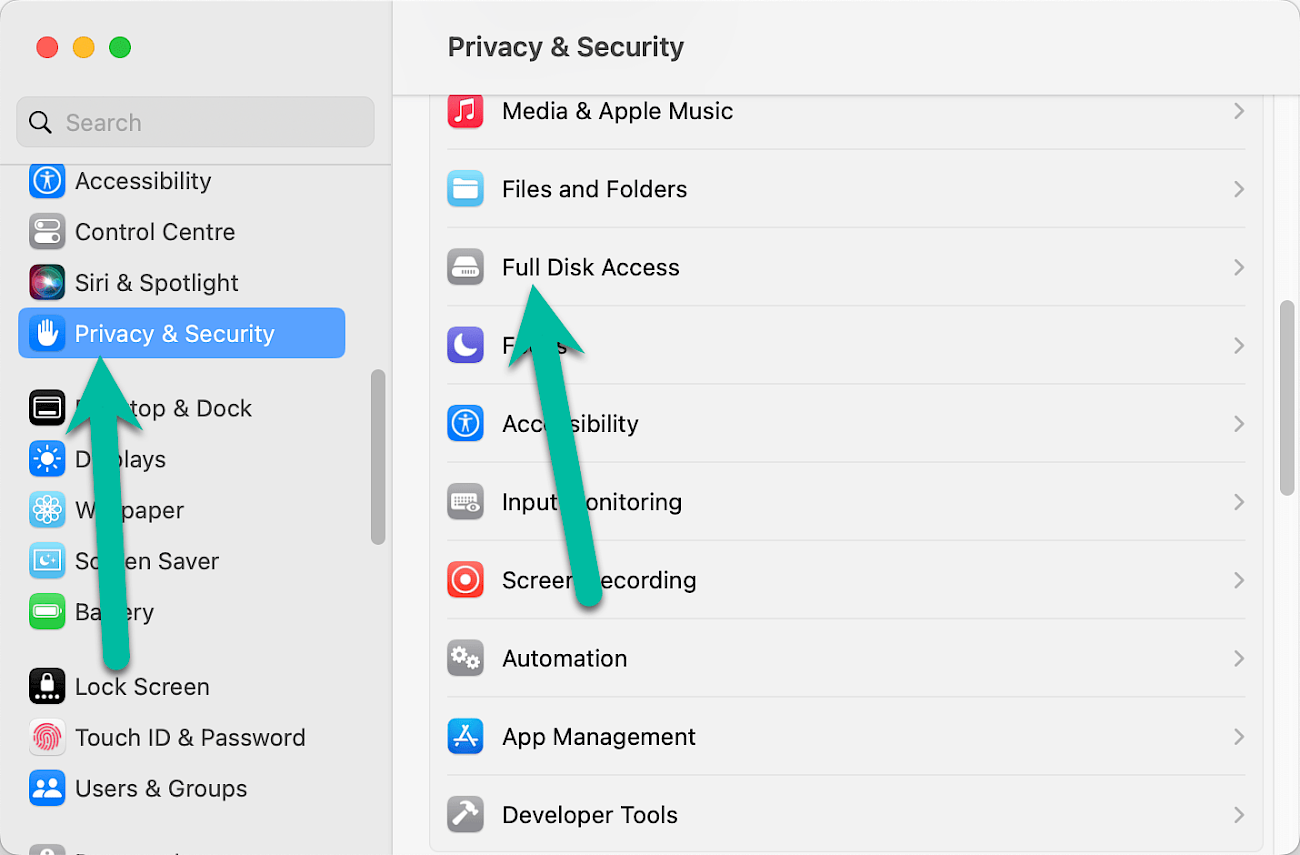
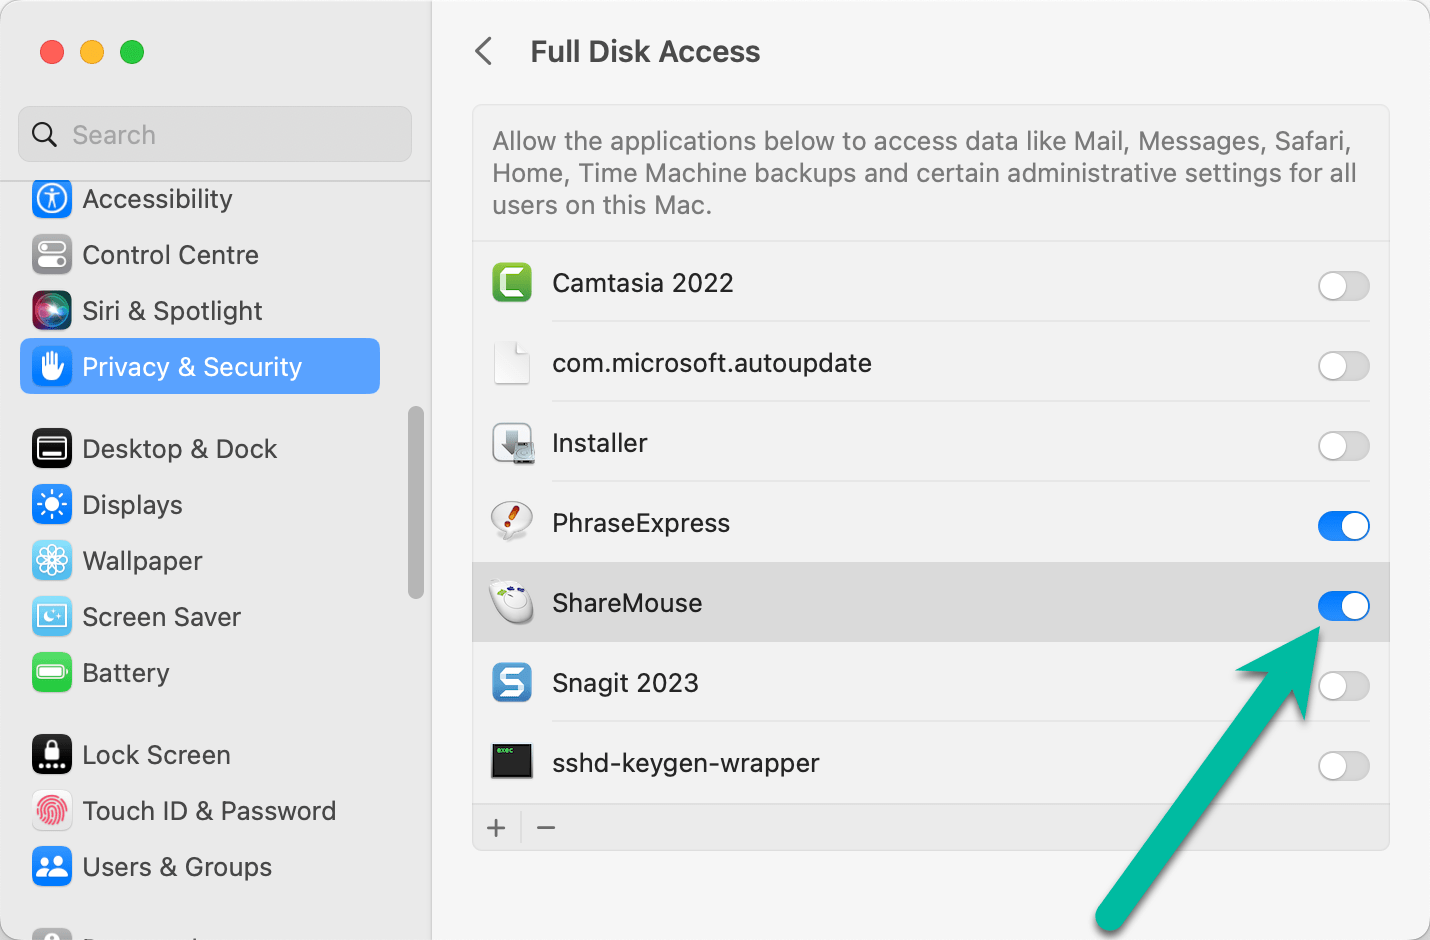
- In the list of applications, lookup "ShareMouse" and make sure that the option is enabled:


Troubleshooting macOS system permissions
The macOS system permissions may not work, although the settings seem to be correct. This can occur, for example, after a macOS and/or ShareMouse update, since macOS may consider an update as a unknown new software.
Solution:
- Quit ShareMouse.
- Repeat the above macOS security settings by removing ShareMouse with the - button and then adding again with the + button, regardless if the entry already exists! This seems counter-intuitive, but may fix issues with the macOS preferences database in some cases.
- Restart the Mac.
If this doesn't help, delete ShareMouse from your computer, remove all ShareMouse entries in macOS Security Preferences, reinstall ShareMouse and do the security settings again. Installing ShareMouse in a different directory may also help.
Experts only: The macOS security and privacy database sometimes seems to be(come) unstable. To initialize the system permission database (for all apps!), use the command "sudo tccutil reset Accessibility" in the macOS Terminal App.
Upgrade
Newer ShareMouse versions can be safely installed over an existing installation. Settings will be preserved.
If you renewed an expired maintenance, deregister the old license key from the installation and register the new license key.
Make sure to update/upgrade ShareMouse on all computers. Do not mix different ShareMouse versions.
IMPORTANT: MacOS may require to uncheck and check again the macOS security settings.